Authentication for Embedding Tableau (Connected Apps)
Use case: A software company wants to embed analytics in their app. Their customers log into their application directly.
Ideally, these customers are then also automatically signed in to see Tableau content. Authentication refers to the process of logging in to any application. In our case, we want the user to believe they are logging in to a single application, whereas in reality we'll be serving them content from our web application and Tableau Server.
There are generally two methods which can be used in this scenario:
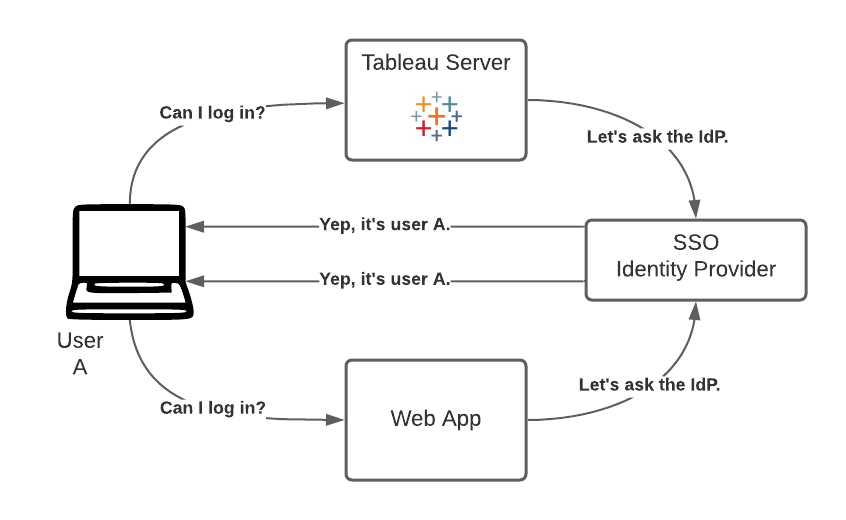
Single Sign-On
This setup relies on using the same Identity Provider (IdP) or Single Sign-On solution for both the application and Tableau. Because authentication is delegated to this IdP by both the app and Tableau, logging in once suffices, as either application relies on the IdP. Having a centralized IdP is convenient, but not always the case in all organizations.
Connected Apps
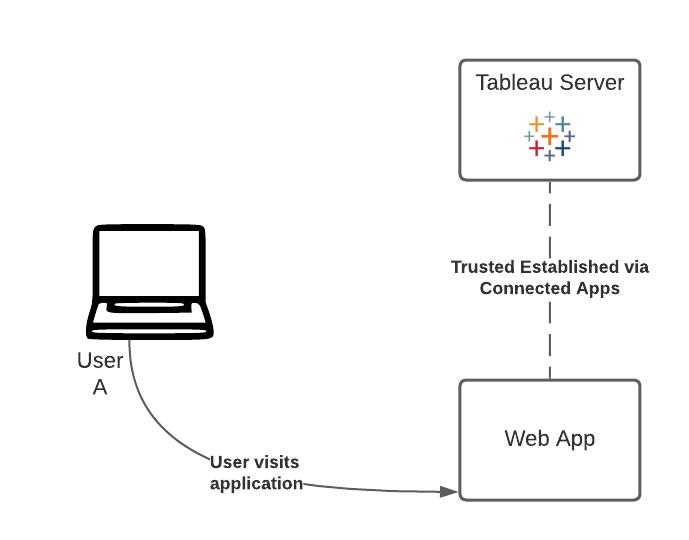
Tableau connected apps enable a seamless and secure authentication experience by facilitating an explicit trust relationship between your Tableau Online/Server Site and custom applications where Tableau content is embedded. The trust relationship between your Tableau Online site and custom application is established and verified through an authentication token in the JSON Web Token (JWT) standard, which uses a shared secret provided by the Tableau connected app and signed by your custom application.

The method demonstrated on this page is the one of Connected Apps. Usually Single Sign-On is the preferred approach if available, but Connected Apps provides a modern and trusted alternative for organizations and cases where SSO is not applicable in the traditional sense.
0. Creating/Registering a Connected App
Before starting the actual procedure for signing in from a Connected App, the trust relationship between Tableau Server/Online and the app needs to be established. This can either be done through the REST API, or through the UI.
Conceptually, what we are doing is:
- Creating a connected app which defines which content the application can access, as well as from where.
- Creating the secrets that go with this connected app. The combination of this secret with the information defined in the connected app, is the key to getting access to visualizations and embedding them.
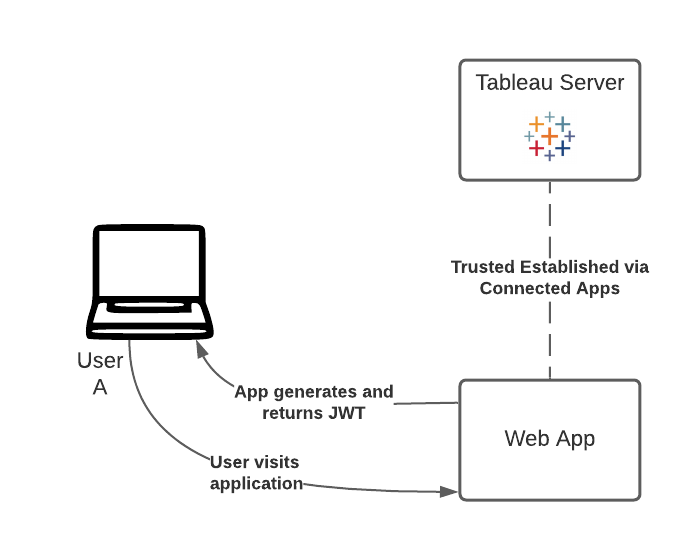
1. Sign in to the Application
Before going through the process of authenticating to Tableau, we'll need our user to be logged in to our web application itself; the Connected App, that is. You might have created your user in the previous step. If not, you can use the demo credentials on the right. If you have, feel free to use your own.
Complete and submit the form on the right. This will log you in to our web application (but not yet to Tableau).
Login Form
Sign in with the account you've created in the previous step, or use the demo credentials below:
- Username:
ronald.schoonheere@company.com - Password:
ronald.schoonheere@company.com
2. Generating the JWT for the user
It is the responsibility of the web application to now authenticate the user with Tableau Server, by generating and sending a valid JWT. JWT stands for JSON Web Token, which is a standard used to securely transfer information between two parties. The JWT is signed by your custom application to securely send information to Tableau Online. The JWT references the connected app, the user that the session is being generated for, and the level of access the user should have.
A valid JWT includes a number of items, including the Connected App's ID, the secret's ID and the secret itself, as well as a bunch of "metadata". This "metadata" includes things such as a timestamp, a scope, a subject (the user), etc.
Below is the information we'll use to generate a JWT token to then embed a view in this page. Specifically, it is an excerpt of the Python code used.
Generate JWT in Python
Code (other examples):jwt_payload = {
"sub": "",
"aud": "tableau",
"scp": ["tableau:views:embed"],
"exp": datetime.datetime.utcnow()
+ datetime.timedelta(days=0, seconds=300), # 5 minutes from now
"jti": str(uuid.uuid4())
}
jwt_headers = {
"iss": current_app.config["TABLEAU_SERVER_CONAPP_CLIENT_ID"],
"kid": current_app.config["TABLEAU_SERVER_CONAPP_CLIENT_KEY_ID"]
}
encoded_jwt = jwt.encode(
payload=jwt_payload,
headers=jwt_headers,
algorithm="HS256",
key=current_app.config["TABLEAU_SERVER_CONAPP_CLIENT_SECRET"])
encoded_jwt_str=encoded_jwt.decode("utf-8")Resulting JWT
If you're logged in, you can now click "Generate JWT!" to generate the token server-side.
JWT:Once the JWT appears above, you can use a JWT debugger to decode it and verify its information.
3. Use the JWT to embed the View
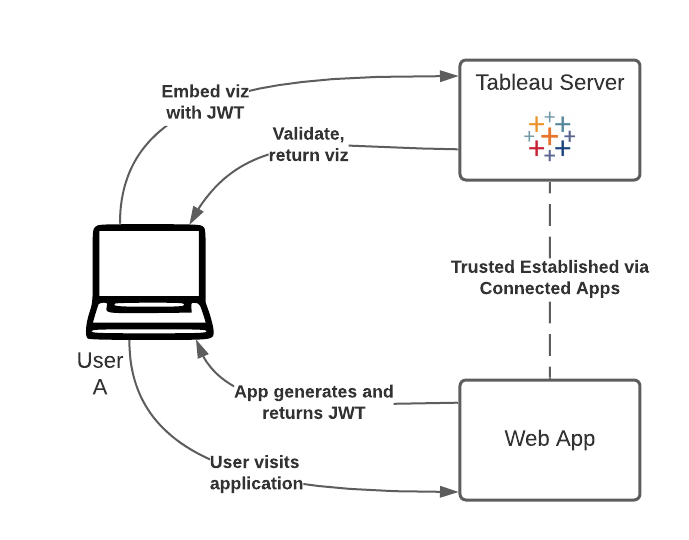
The final step that consists of redeeming (i.e. using) the JWT to display the view, is implemented here with version 3 of the Embedding API. Click "Use our JWT!" above to generate the code and render viz.
          <script src="https://dub01.online.tableau.com/javascripts/api/tableau.embedding.3.latest.js"></script>
          <tableau-viz id="tableauViz"
          src="https://dub01.online.tableau.com/t/biztorybenelux/views/JWT/JWT"
          token=""
          device="default"
          toolbar="bottom"
          hide-tabs
          height="600px"
          width="330px"
          style="width: 100%; max-width: 330px; height: 610px; max-height: 610px;">
          </tableau-viz>
Finally, Tableau Server receives our request for the viz, containing our JWT. It creates a session, logs the user in, and allows us to display the view. The session allows the user to access any of the views that the user would have if they logged onto the server.
In our case, the viz that is displayed on the left was "retrieved" with a JWT. It lists the session on our Tableau Server, with the ones in light blue reflecting the ones that were created with this type of token.
What Else?
If you're interested, here is a full-screen (real-time!) dashboard embedded as a Connected App with the guest user of a core license: Real-time Drums Dashboard.